
Are you interested in creating your own blog? Have you ever considered using Node.js as a platform for your blog? In this article, we will explore the steps involved in creating a simple blog using Node.js, a popular JavaScript runtime. By the end of this article, you will have a fully functioning blog that can be easily customized to fit your specific needs.
Introduction to Node.js
Before we dive into the specifics of creating a blog using Node.js, let’s take a moment to discuss what Node.js is. Node.js is a JavaScript runtime built on Chrome’s V8 JavaScript engine. It allows developers to write server-side code using JavaScript, which was previously only possible on the client-side. Node.js is used by many developers to create web applications and APIs.
Setting up the Environment
Before we can start building our blog, we need to set up the environment. This includes installing Node.js and creating a project directory. We can do this by following these steps:
- Install Node.js on your computer.
- Open a terminal window and create a new directory for your project using the command
mkdir my-blog. - Navigate into the new directory using the command
cd my-blog. - Initialize a new Node.js project using the command
npm init -y. This will create apackage.jsonfile in your directory.
Installing Dependencies
Next, we need to install the dependencies that we will be using for our blog. These include Express, EJS, and Body-parser. We can do this by running the following command in our terminal:
css

npm install express ejs body-parser --save
Creating the Server
Now that we have our environment set up and our dependencies installed, we can start creating our server. We will be using the Express framework to create our server. Here’s how we can do it:
- Create a new file in your project directory called
server.js. - Add the following code to the top of the file:
javascript

const express = require('express');
const app = express();
const bodyParser = require('body-parser');
const port = process.env.PORT || 3000;

app.use(bodyParser.urlencoded({ extended: true }));
app.use(bodyParser.json());

app.set('view engine', 'ejs');

app.listen(port, () => {
  console.log(`Server running on port ${port}`);
});
This code sets up the Express app, sets the view engine to EJS, and listens on port 3000 (or the port defined in the environment variable PORT).
Creating the Views
Now that we have our server set up, we can start creating our views. We will be using EJS as our templating engine. Here’s how we can create our views:
- Create a new directory in your project directory called
views. - Create a new file in the
viewsdirectory calledindex.ejs. - Add the following code to the
index.ejsfile:
html

<!DOCTYPE html>
<html>
  <head>
    <title>My Blog</title>
  </head>
  <body>
    <h1>Welcome to my blog</h1>
  </body>
</html>
This code creates a simple HTML file with a heading that says “Welcome to my blog”.
Creating the Routes
Now that we have our server set up and our views created, we can start creating our routes. Routes are used to handle incoming requests to our server and return the appropriate response. Here’s how we can create our routes:
- Add the following code to the bottom of the
server.jsfile:
javascript

app.get('/', (req, res) => {
res.render('index');
});
This code sets up a route for the home page ('/') and tells the server to render the index.ejs file when the home page is requested.
Running the Server
Now that we have everything set up, we can start our server and see our blog in action. Here’s how we can run our server:
- Open a terminal window and navigate to your project directory.
- Run the command
node server.js. - Open your web browser and go to
http://localhost:3000.
You should now see your blog homepage with the heading “Welcome to my blog”.
Creating the Blog Posts
Now that we have our basic blog set up, we can start creating our blog posts. We will be using MongoDB to store our blog posts. Here’s how we can set up our MongoDB database:
- Install MongoDB on your computer.
- Open a terminal window and run the command
mongod. This will start the MongoDB server. - Open another terminal window and run the command
mongo. This will open the MongoDB shell. - In the MongoDB shell, create a new database called
my-blogusing the commanduse my-blog.
Now that we have our database set up, we can start creating our blog posts. Here’s how we can do it:
- Create a new file in your project directory called
models.js. - Add the following code to the
models.jsfile:
javascript

const mongoose = require('mongoose');
const Schema = mongoose.Schema;

const postSchema = new Schema({
  title: String,
  content: String
});

const Post = mongoose.model('Post', postSchema);

module.exports = Post;
This code sets up a schema for our blog posts and exports a Post model that we can use to interact with our MongoDB database.
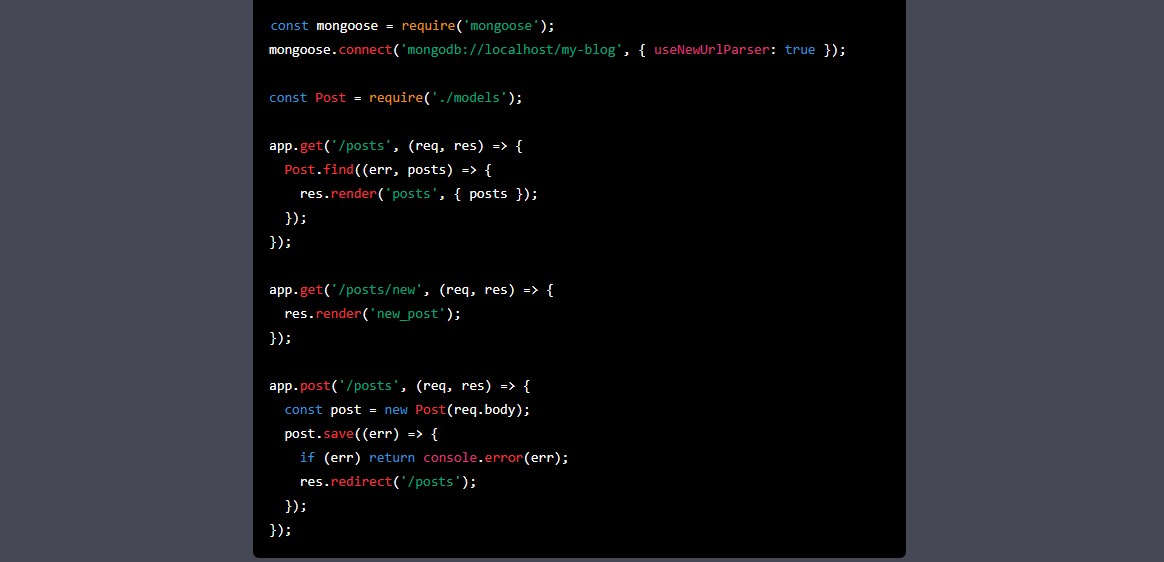
- Add the following code to the
server.jsfile to set up the routes for creating and displaying blog posts:
javascript

const mongoose = require('mongoose');
mongoose.connect('mongodb://localhost/my-blog', { useNewUrlParser: true });

const Post = require('./models');

app.get('/posts', (req, res) => {
  Post.find((err, posts) => {
    res.render('posts', { posts });
  });
});

app.get('/posts/new', (req, res) => {
  res.render('new_post');
});

app.post('/posts', (req, res) => {
  const post = new Post(req.body);
  post.save((err) => {
    if (err) return console.error(err);
    res.redirect('/posts');
  });
});
This code sets up routes for displaying all blog posts (/posts), creating a new blog post (/posts/new), and saving the new blog post to the database (/posts).
- Create a new directory in your project directory called
views/posts. - Create a new file in the
views/postsdirectory calledposts.ejs. - Add the following code to the
posts.ejsfile:
html

<!DOCTYPE html>
<html>
  <head>
    <title>My Blog - Posts</title>
  </head>
  <body>
    <h1>Blog Posts</h1>
    <% for (let i = 0; i < posts.length; i++) { %>
      <h2><%= posts[i].title %></h2>
      <p><%= posts[i].content %></p>
    <% } %>
    <a href="/posts/new">New Post</a>
  </body>
</html>
- Create a new file in the
views/postsdirectory callednew_post.ejs. - Add the following code to the
new_post.ejsfile:
<!DOCTYPE html>
<html>
  <head>
    <title>My Blog - New Post</title>
  </head>
  <body>
    <h1>New Post</h1>
    <form method="post" action="/posts">
      <div>
        <label for="title">Title</label>
        <input type="text" id="title" name="title">
      </div>
      <div>
        <label for="content">Content</label>
        <textarea id="content" name="content"></textarea>
      </div>
      <div>
        <button type="submit">Save</button>
      </div>
    </form>
  </body>
</html>
This code sets up a form for creating a new blog post with fields for the title and content.
- Start your server with the
node server.jscommand. - Open your web browser and go to
http://localhost:3000/posts. - Click the “New Post” link and create a new blog post.
- Go back to the blog homepage and click the link to view all blog posts. You should see your newly created blog post listed.
Conclusion
In this article, we’ve learned how to create a simple blog using Node.js. We’ve covered setting up the server, creating the blog posts, and displaying them on the blog homepage. With this knowledge, you can expand your blog by adding features like comments, tags, and user authentication. Node.js provides a powerful platform for building web applications, and with a little bit of JavaScript knowledge, you can create just about anything.
FAQs
1. Can I use a different database instead of MongoDB?
Yes, you can use any database that has a Node.js driver. Some popular options include MySQL, PostgreSQL, and SQLite.
2. Can I use a different templating engine instead of EJS?
Yes, you can use any templating engine that is supported by Node.js. Some popular options include Handlebars, Pug, and Mustache.
3. Can I deploy my blog to a hosting provider?
Yes, you can deploy your blog to a hosting provider like Heroku, DigitalOcean, or AWS. You will need to set up your server and database on the hosting provider and then deploy your code.
4. How do I add authentication to my blog?
There are many authentication libraries available for Node.js, including Passport and JSON Web Tokens (JWT). You can use one of these libraries to add authentication to your blog.
5. How do I add comments to my blog?
You can create a new model for comments and set up routes for creating and displaying comments. You can then associate each comment with a blog post using a foreign key.